
ubuntu搭建内网dns服务器
公司中经常会搭建一些内部的网站,这些网站只能在公司的局域网中使用(链接同一个路由器的电脑),当访问这些网站时需要在浏览器中手动输入服务器ip地址进行访问,无法通过域名访问(域名:baidu.com 就是一个域名),这时可以通过搭建公司内部的dns服务器解决。
现在想通过访问 http://mygitlab.com 就可以访问到位于 192.168.0.100 主机上的自己搭建的gitlab服务器
本文中要搭建的dns服务器和gitlab服务器在同一台主机上,ip都是192.168.0.100,当然也可以不在同一台主机上
1.下载bind9
执行如下命令
apt-get update
apt-get install bind9
2.然后编辑bind9配置文件
nano /etc/bind/named.conf.default-zones
并在末尾添加
zone "mygitlab.com" {
        type master;
        file "/etc/bind/db.ip2mygitlab.com";
};

zone "100.0.168.192.in-addr.arpa" {
        type master;
        file "/etc/bind/db.mygitlab2ip";
};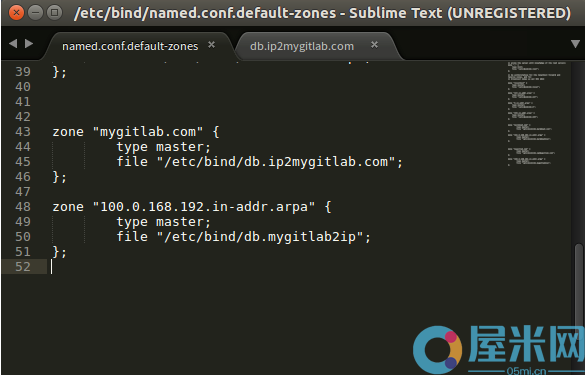
其中100.0.168.192是mygitlab服务器的ip的反写,若你的服务器ip是abc.def.ghi.jkl则在这要写成 jkl.ghi.def.abc 。
3.然后在 /etc/bind 中创建 db.ip2mygitlab.com 文件 和 db.mygitlab2ip 文件,注意这两个文件名要和 name.conf.default-zones 中配置的file相同
编辑db.ip2mygitlab.com 文件中填写如下内容,注意 :需要把下面的mygitlab.com换成你的域名,不要漏掉了域名后面的小数点,
192.168.0.100是mygitlab服务器的ip,需要替换成你自己的。
;
; BIND data file for local loopback interface
;
$TTL    604800
@       IN      SOA     ns.mygitlab.com. root.mygitlab.com. (
                              2         ; Serial
                         604800         ; Refresh
                          86400         ; Retry
                        2419200         ; Expire
                         604800 )       ; Negative Cache TTL
;
@       IN      NS      ns.mygitlab.com.
@       IN      A       192.168.0.100
ns      IN      A       192.168.0.100
cn      IN      A       192.168.0.100
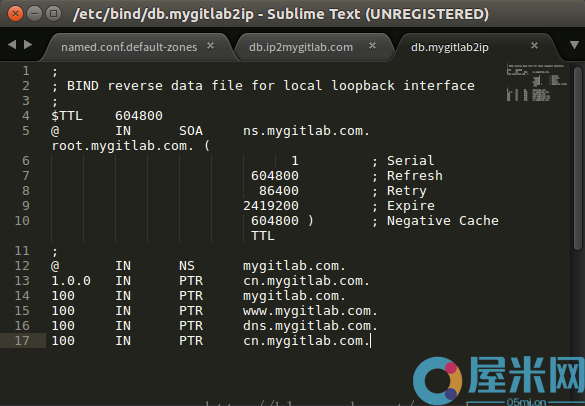
4.然后在db.mygitlab2ip文件中填写如下内容,同样要替换mygitlab.com为你的域名。100是mygitlab服务器的ip的最后一段,需要替换成你自己的。
;
; BIND reverse data file for local loopback interface
;
$TTL    604800
@       IN      SOA     ns.mygitlab.com. root.mygitlab.com. (
                              1         ; Serial
                         604800         ; Refresh
                          86400         ; Retry
                        2419200         ; Expire
                         604800 )       ; Negative Cache TTL
;
@       IN      NS      mygitlab.com.
1.0.0   IN      PTR     cn.mygitlab.com.
100     IN      PTR     mygitlab.com.
100     IN      PTR     www.mygitlab.com.
100     IN      PTR     dns.mygitlab.com.
100     IN      PTR     cn.mygitlab.com.
然后修改 /etc/bind/named.conf.options文件为如下内容
options {
    directory "/var/cache/bind";

    // If there is a firewall between you and nameservers you want
    // to talk to, you may need to fix the firewall to allow multiple
    // ports to talk.  See http://www.kb.cert.org/vuls/id/800113

    // If your ISP provided one or more IP addresses for stable
    // nameservers, you probably want to use them as forwarders.
    // Uncomment the following block, and insert the addresses replacing
    // the all-0's placeholder.

     forwarders {

        202.101.172.35;
        202.101.172.47;

     };

    //========================================================================
    // If BIND logs error messages about the root key being expired,
    // you will need to update your keys.  See https://www.isc.org/bind-keys
    //========================================================================
    dnssec-validation auto;

    auth-nxdomain no;    # conform to RFC1035
    listen-on-v6 { any; };
};
其实只需要修改
forwarders {
        202.101.172.35;
        202.101.172.47;

     };
这个很关键,网上很多人说修改成 8.8.8.8 或 8.8.4.4 或 0.0.0.0,当修改成这三个后会发现访问外网特别慢,比如在公司内网访问 baidu.com,
就非常慢,访问任何一个外网都很慢,原因是本地没有配置外网域名对应的ip,所以 bind9会去8.8.8.8 或 8.8.4.4 或 0.0.0.0这几个dns服务器查询ip,
本文中修改成了202.101.172.35;
202.101.172.47; 是因为自己搭建的dns服务器位于杭州,用的电信的网,所以设置成了 202.101.172.35;
202.101.172.47;,具体设置成多少由你所在地区的网络提供上决定(你可以先百度一下ip就可以知道用的是电信还是联通还是移动的网,
然后在百度一下你所在城市对应网络提供商的dns服务器的ip即可)
然后执行service bind9 restart重启bind9 dns服务器,
可以通过 nslookup 你的域名 查看是否配置成功
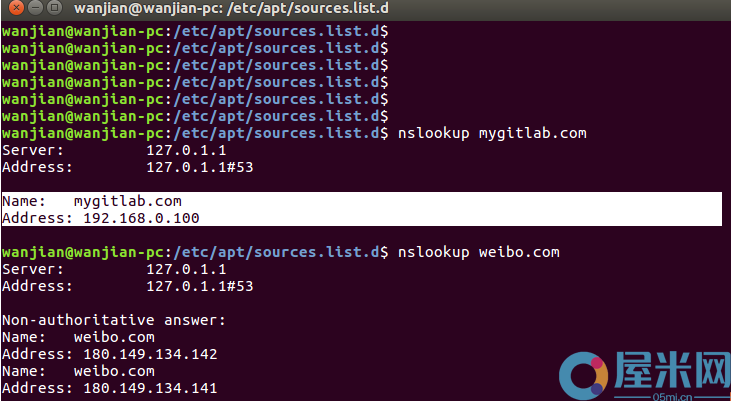
返回结果解析成功!